How to End or Modify a Lease
The PRO section gives you structured tools to build custom Lease-to-Own contracts. This interface combines real-time market data with precise parameter control. You define every element of your lease agreement—from down payment percentage to contract duration.
This article explains how to use DESK for market analysis and Deal Builder for contract creation.
What You'll Find in PRO
When you open the PRO section, you see two main areas:
DESK – Your market intelligence center. This shows you real-time asset prices, market conditions, and quick-start lease options.
DEAL BUILDER – Your contract workshop. This is where you design your own lease from scratch. You control the down payment, payment schedule, and contract length.
Both tools work together. DESK helps you understand the market. Deal Builder helps you act on it.
Part 1: Understanding DESK
What DESK Does
DESK is your information dashboard. It does not execute trades. It does not require you to do anything. It simply shows you what is happening in the market right now.
You see three key indicators at the top:
Sentiment: BEARISH
This tells you how traders are currently feeling. Bearish means most people expect prices to fall. Bullish means they expect prices to rise. This number updates constantly based on real trading activity.
Volatility
This measures how much prices are jumping around. "Low" means prices are stable. "High" means prices are moving quickly. Lower volatility makes planning easier.
Liquidity
This shows how much trading activity exists. "Deep" means lots of people are buying and selling. This is good—it means you can enter and exit positions smoothly.

Capital Engine
Below the market indicators, you see two numbers:
Yield: %
This is the potential return you could earn on a leased position. It updates based on current market conditions. This number reflects what the platform calculates as possible earnings during your lease period.
Spread: %
This is the difference between the buying price and the selling price in the market. A smaller spread means better pricing for you. Think of it as the gap between what sellers want and what buyers offer.

Asset Cards
Further down DESK, you see individual cards for each cryptocurrency:
Each card shows:
The asset symbol (BTC for Bitcoin)
The full name (Bitcoin)
Current price ($)
How much the price changed today (%)
An "Own" button to start a lease immediately
These cards give you a quick snapshot. If you see an asset you want to own, you can click "Own" and jump straight to creating a lease.

Part 2: Building Your Own Lease
Opening Deal Builder
Click the "DEAL BUILDER" tab at the top of the PRO section.
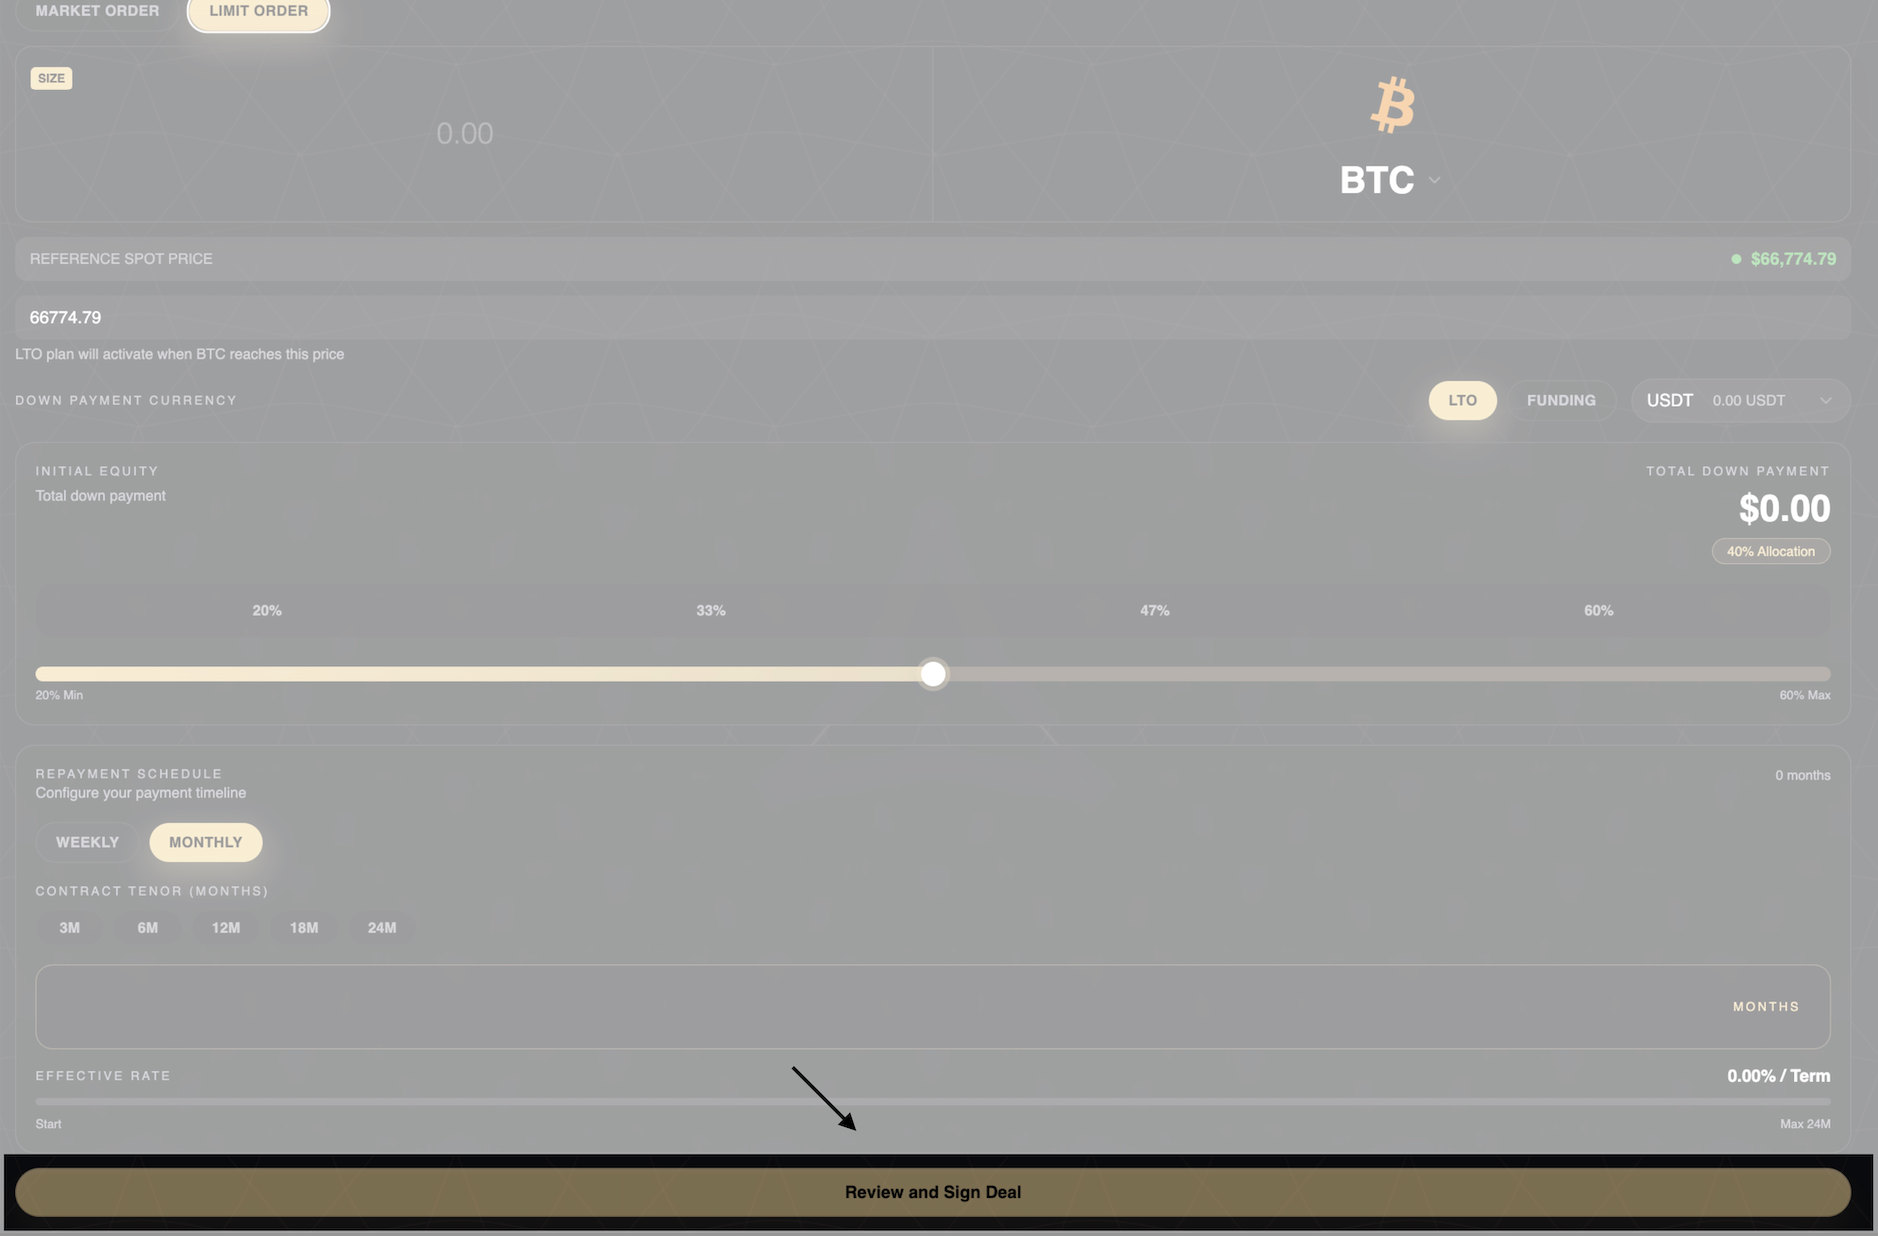
You now see a clean workspace. Every field here represents a choice you make about your lease. Nothing happens automatically. You design everything.
Step 1: Choose Your Order Type
At the top, you see two options:
MARKET ORDER
This means "execute my lease right now at today's price." When you click Market Order, your lease activates immediately using the current asset price. This is the standard choice for most users.
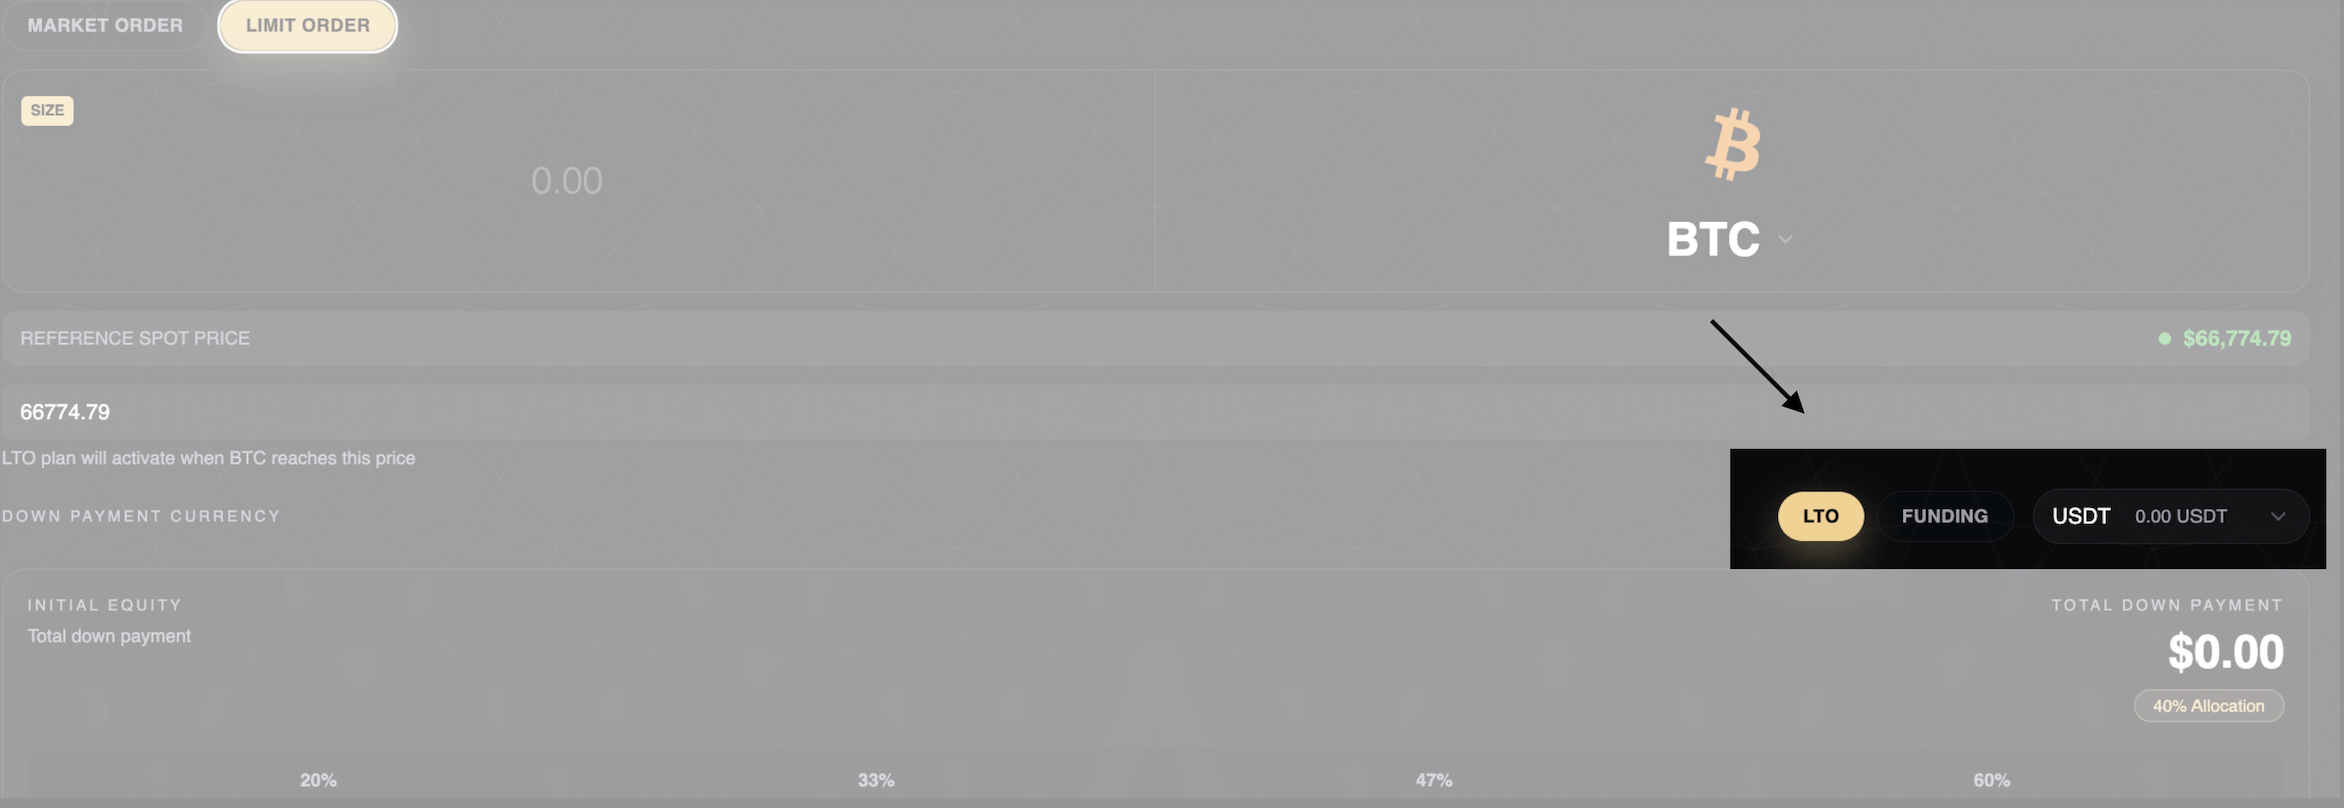
LIMIT ORDER
This means "wait until the price reaches a specific level, then activate my lease." You set a target price. The platform waits. When the market hits that price, your lease begins. If the market never reaches your price, the lease never starts.
Which Should You Choose?
Market Order: You want to start now.
Limit Order: You want to wait for a better entry price.
Step 2: Enter the Asset Amount
You see a field labeled "SIZE."
This is where you enter how much cryptocurrency you want to lease. For example:
BTC (Bitcoin)
ETH (Ethereum)
Any amount within the platform's minimum requirements
The amount you enter here determines everything else. It sets your total cost, your down payment, and your monthly installments. Start with an amount you are comfortable financing over time.
Next to the SIZE field, you see a dropdown menu. This lets you choose which cryptocurrency you want to lease. Click it to see available options (BTC, ETH, etc.).
The current price displays next to the asset symbol. This updates in real time.
Step 3: Set Your Reference Price
This section looks different depending on your order type.
If You Choose Market Order:
You see "REFERENCE SPOT PRICE" with a green indicator. This shows the current live market price. This is the price your lease will use when you finalize the contract.
The green indicator means the connection is live. The price updates every second.
If You Choose Limit Order:
You see an empty field. You type in your target price manually. Use only numbers and a decimal point. No commas. No dollar signs.
Example: 68837.73
Below this field, you see the explanation: "LTO plan will activate when BTC reaches this price."
Important:
For Market Orders, you accept whatever the current price is.
For Limit Orders, you set the price you want. But there is no guarantee the market will reach it.
Step 4: Choose Your Down Payment Currency
You see two tabs:
LTO
This means you pay your down payment using Bitlease's LTO token. Your current LTO balance displays below the tab (example: "0.00 USDT").
FUNDING
This means you pay your down payment using USDT (a stablecoin) from your FUNDING wallet. Your current USDT balance displays here.
Which Should You Choose?
Most users choose FUNDING because USDT is stable and widely available. LTO is an option if you already hold Bitlease tokens and prefer to use them.
Why Two Options Exist:
Flexibility. Some users earn LTO tokens through the platform and want to use them for new leases. Others prefer the simplicity of paying with stablecoins.
Step 5: Adjust Your Down Payment Percentage
You see a slider labeled "INITIAL EQUITY."
This slider lets you choose how much you pay upfront. The range is 20% to 60%.
How the Slider Works:
Drag the circle left or right. As you move it, the percentage changes. You see numbers marked along the slider: 20%, 33%, 47%, 60%.
Below the slider, you see "TOTAL DOWN PAYMENT: $0.00." This number updates as you adjust the percentage.
Higher down payment = You own more from day one. Your monthly payments are smaller.
Lower down payment = You own less initially. Your monthly payments are larger.
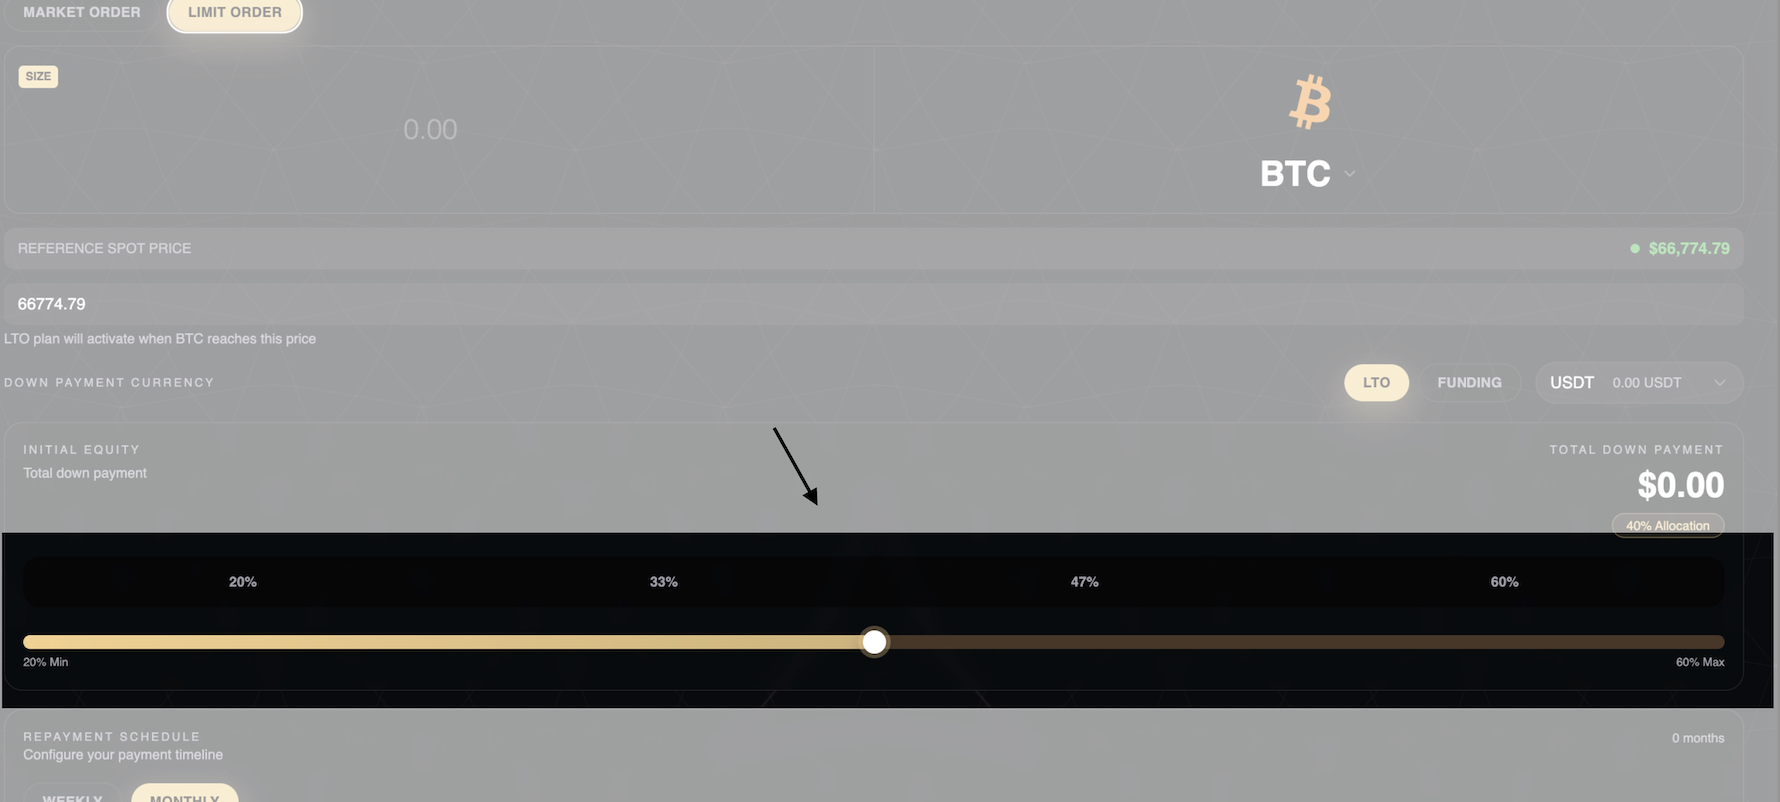
Step 6: Set Your Payment Schedule
You see two options under "REPAYMENT SCHEDULE":
WEEKLY
You make payments every week. This spreads the cost into smaller, more frequent installments.
MONTHLY
You make payments once per month. This is the standard schedule most users prefer.
Which Should You Choose?
Monthly: Matches most people's income schedule.
Weekly: Faster path to full ownership. Good if you prefer smaller, more frequent payments.
Below this, you see "CONTRACT TENOR (MONTHS)."
You see clickable buttons: 3M, 6M, 12M, 18M, 24M.
These represent the length of your lease.
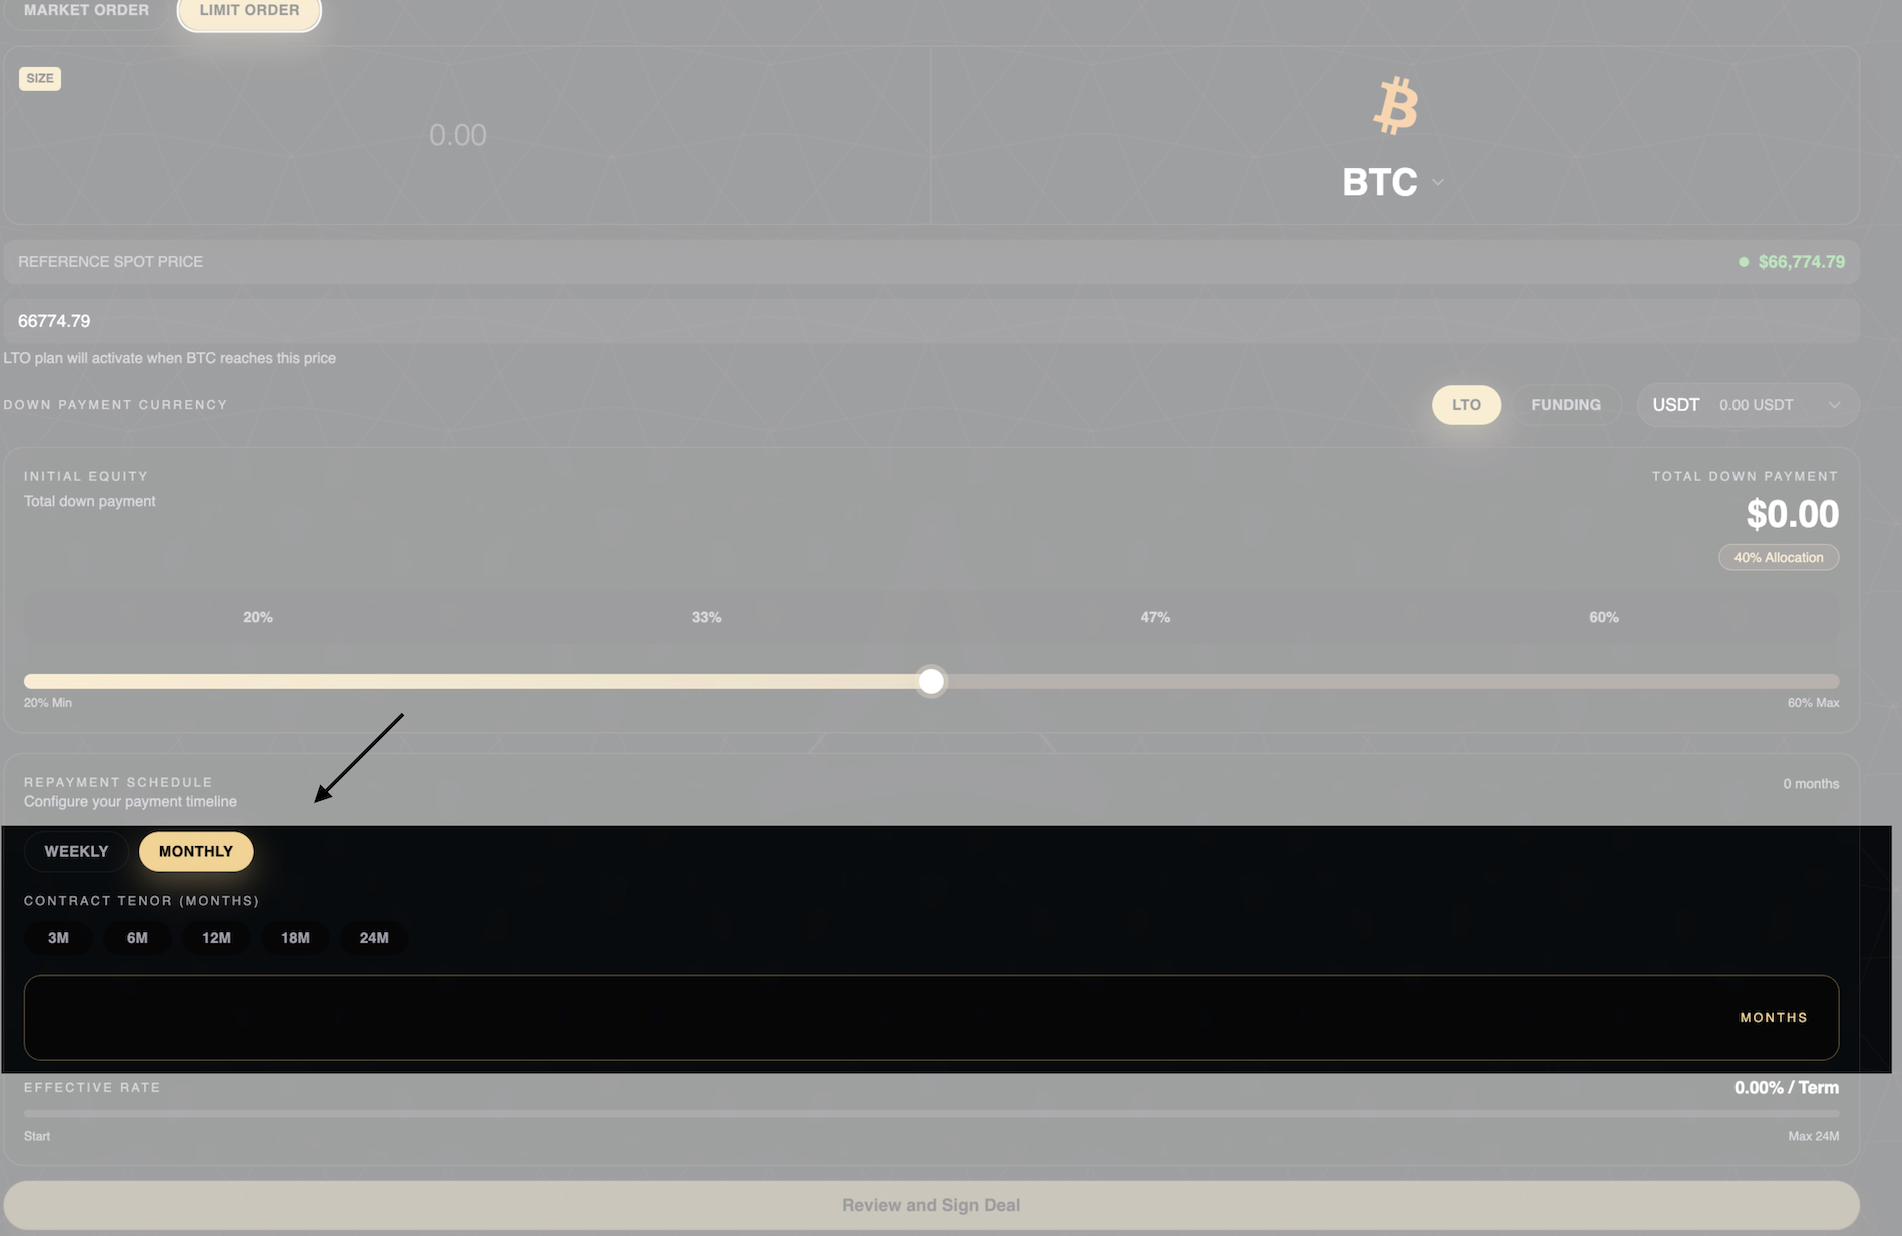
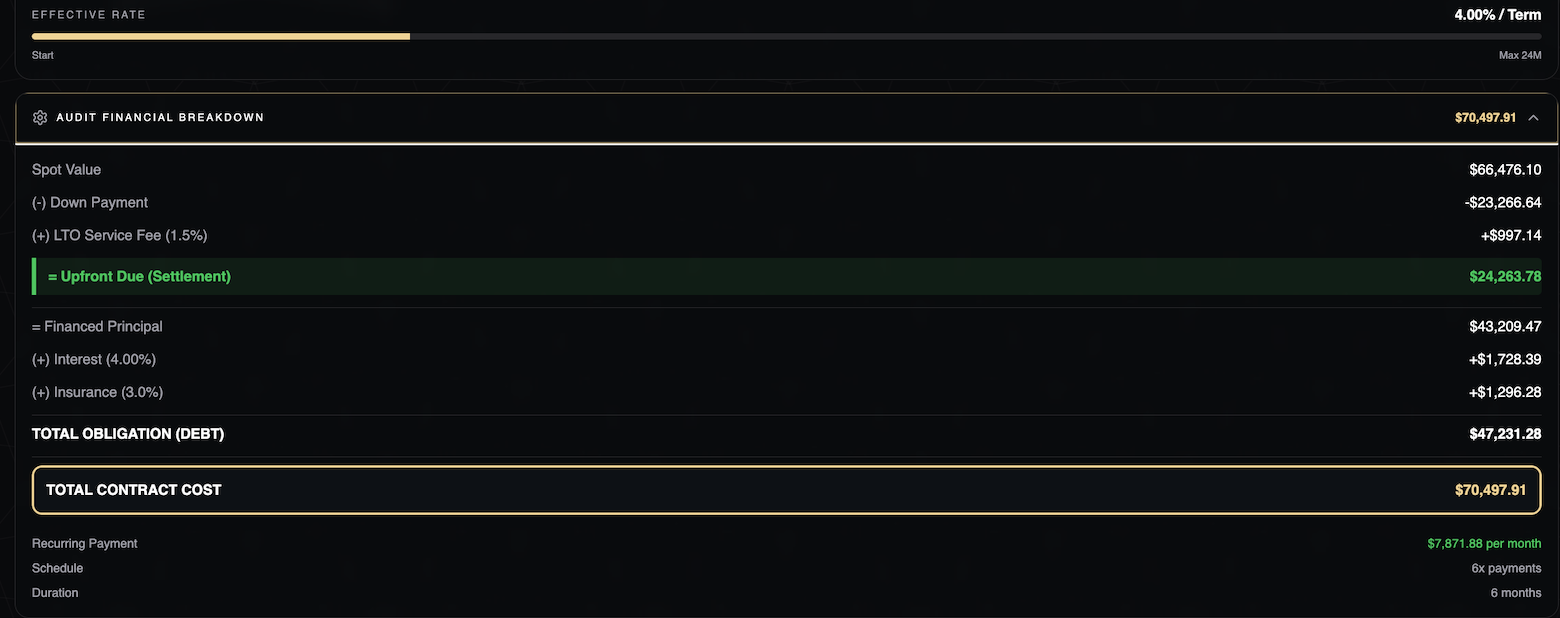
Step 7: Review Your Effective Rate
At the bottom of the screen, you see "EFFECTIVE RATE."
This shows the total cost of your lease expressed as a percentage per term. It includes:
The number you see here is your all-in cost. This is transparent pricing. No hidden fees.
This means over the length of your contract, the total financing cost is 14.5% of the asset's original value.
Scroll to the AUDIT FINANCIAL BREAKDOWN section before signing.
Based on your selected asset, spot price, down payment, and tenor, this panel displays a complete audit breakdown of your contract.
This section ensures full financial clarity before you proceed to sign.
Step 8: Finalize Your Lease
At the very bottom, you see a large button:
"Review and Sign Deal"
This button stays gray until you complete all required fields. Once everything is filled in, the button turns gold (active).
Click this button when you are ready to proceed.
Part 3: Using Pre-Made Plans
If you do not want to build a custom lease, you can choose a pre-made plan.
Scroll down on the Plan page.
You see plan cards. Each card is a pre-structured lease designed for specific goals.
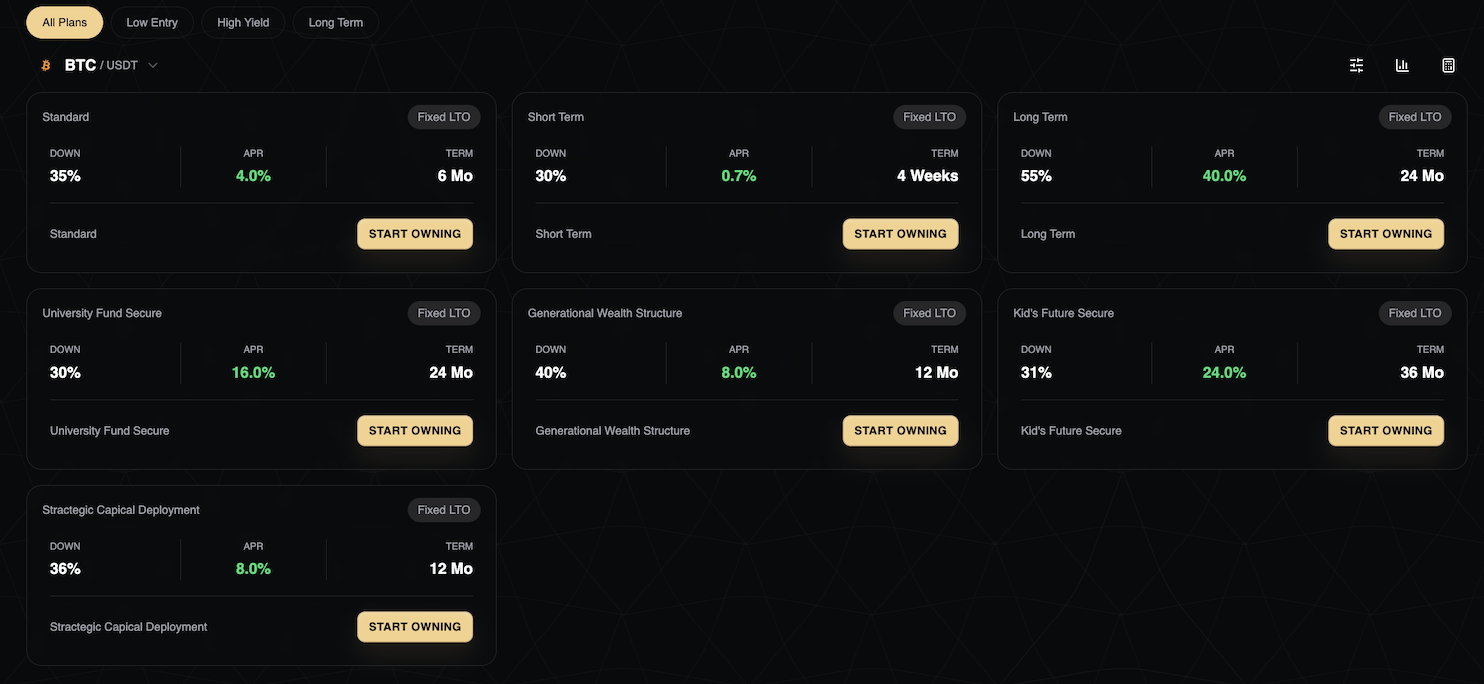
How to Read a Plan Card
Each card shows:
Plan Name
Example: "Long Term," "Kid's Future Secure," "University Fund Secure"
Fixed LTO Badge
This confirms it is a structured lease, not a trading product.
DOWN
The required down payment percentage.
Example: 35%
APR
The annual percentage rate (displayed in green).
Example: 4.00%
TERM
The contract length in months.
Example: 6 Mo
START OWNING Button
Click this to activate the plan immediately.
Part 4: Filtering Plans
At the top of the plan section, you see filter tabs:
All Plans – Shows everything.
Low Entry – Shows plans with lower down payment requirements (good if you have limited capital).
High Yield – Shows plans with higher APR (good if you want maximum returns).
Long Term – Shows plans with longer durations (24-36 months).
Click any tab to filter the visible plans.

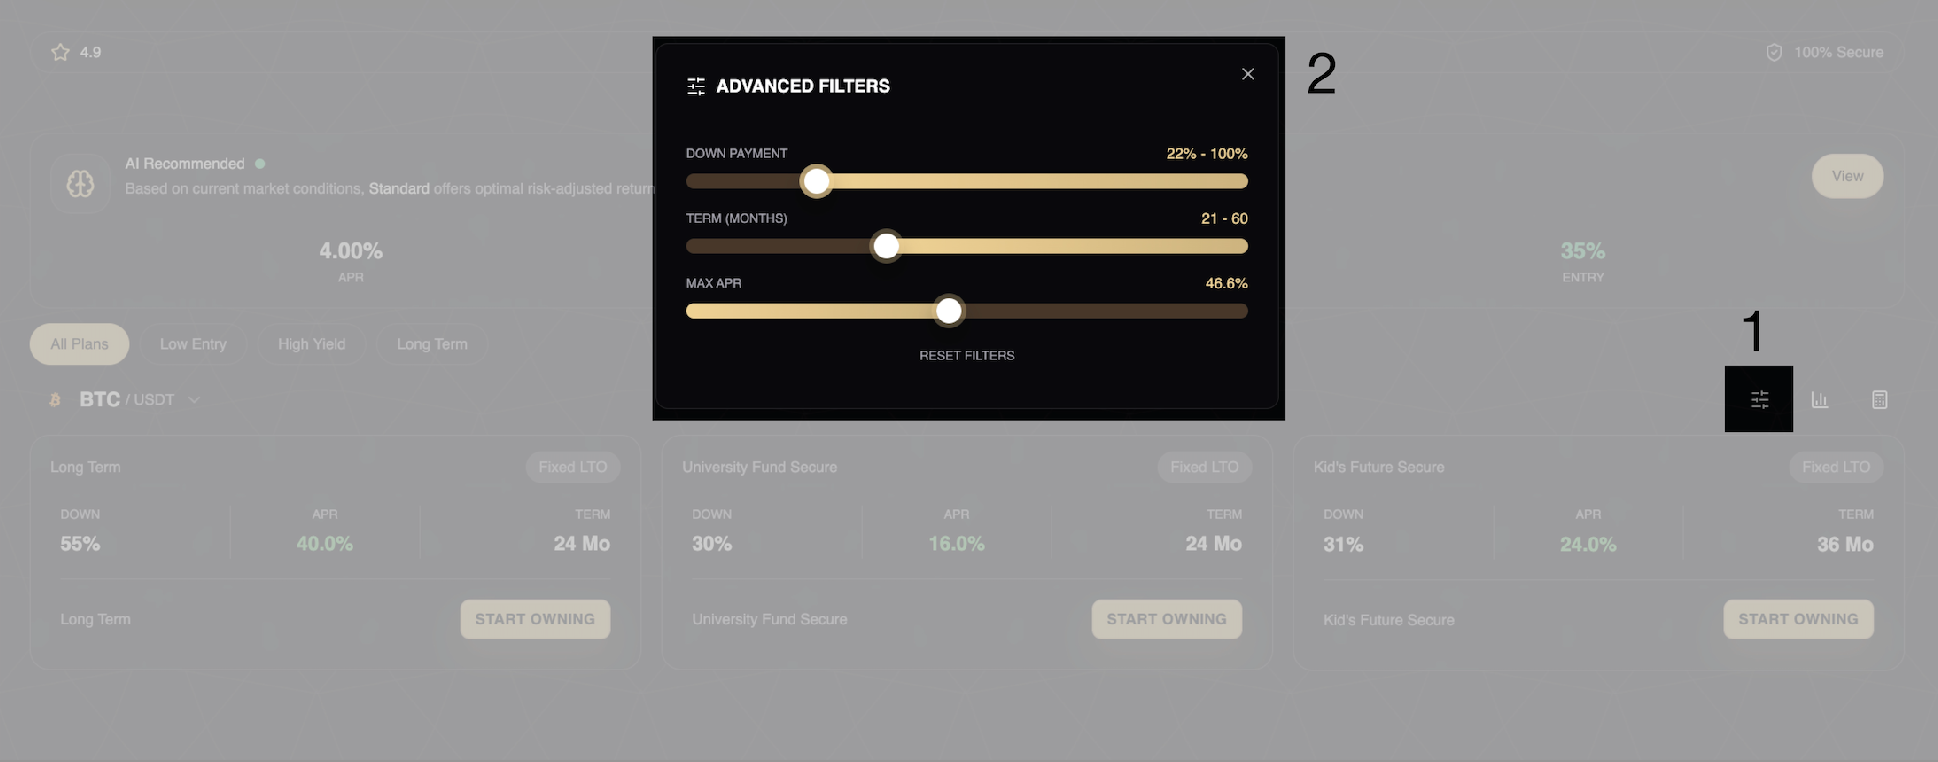
Advanced Filters
Click the filter icon to access sliders:
DOWN PAYMENT Slider
Adjust the range from 0% to 100%. Only plans within your selected range appear.
TERM (MONTHS) Slider
Adjust from 0 to 60 months. Only plans matching your preferred duration appear.
MAX APR Slider
Set the maximum APR you are willing to accept. Plans above this rate are hidden.
RESET FILTERS Button
Click this to clear all filters and return to the default view.
Why Filters Help:
If you know your budget and timeline, filters save time. Instead of scrolling through alll plans, you see only the 3 that match your criteria.
Part 5: Understanding the LTO Calculator
Click the calculator icon to open a calculation overlay.
The calculator shows you exactly what your lease will cost before you commit.
Calculator Fields:
Select Asset
Choose which cryptocurrency you want to lease. The current price displays next to the asset name.
Amount (BTC)
Enter the quantity. Example: 0.5 BTC.
Prepayment (%)
Enter your down payment percentage. Default: 30%.
Payment Interval
Choose Weekly or Monthly.
Number of Payments
Enter total installments. Default: 24.
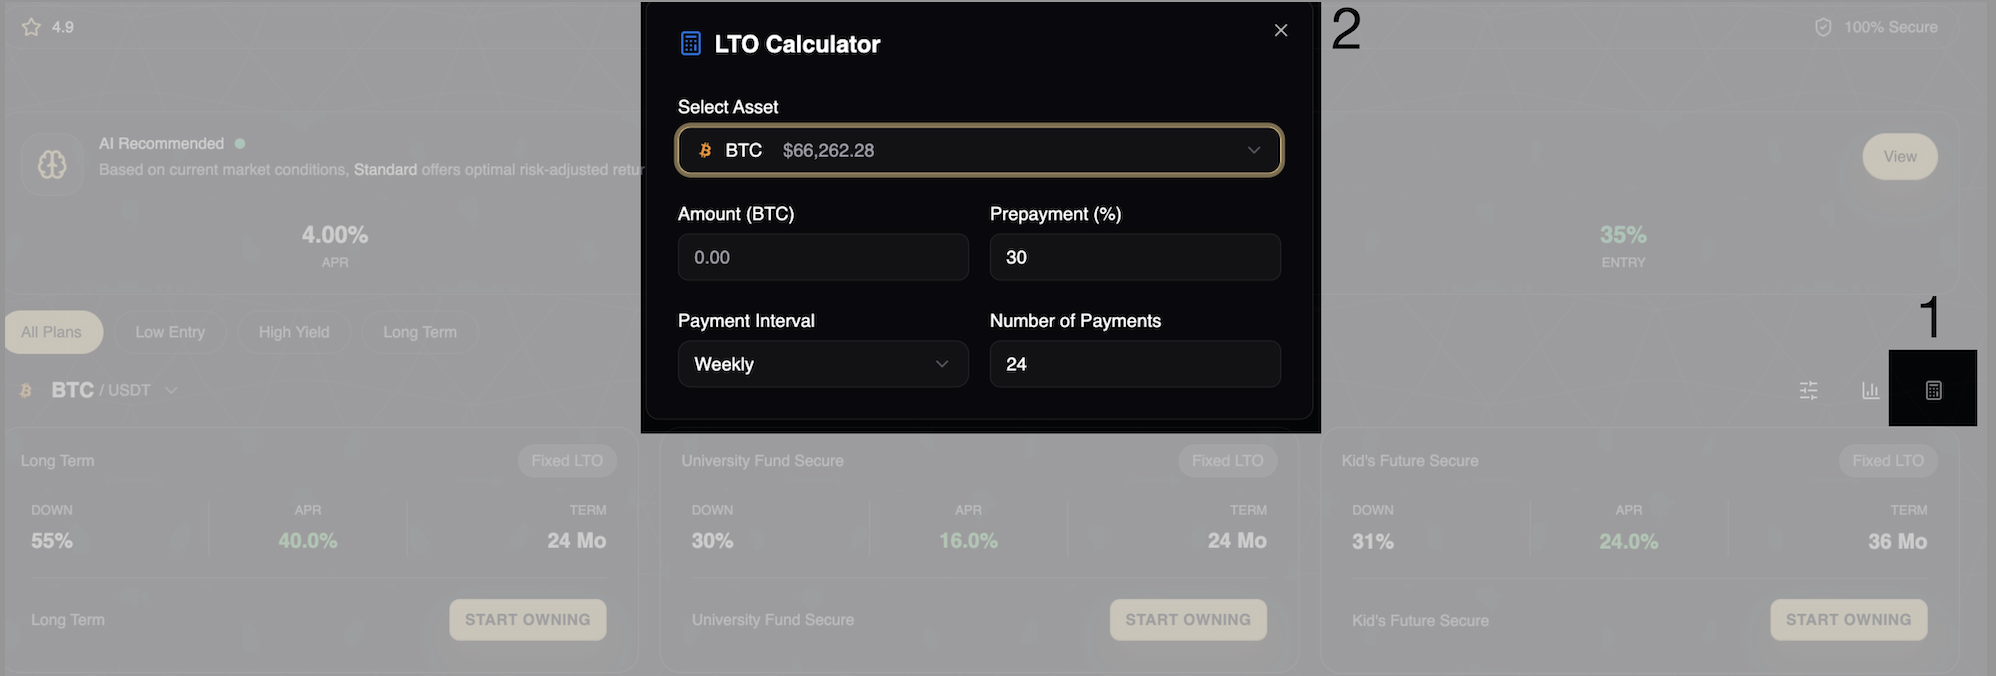
What the Calculator Shows:
As you enter values, the calculator updates instantly. It shows:
Principal (asset value)
Down payment amount
Amount to finance
Platform fee (1.5%)
APR fee (8% annually, prorated)
Insurance fee (6% annually, prorated)
Total cost
Why This Matters:
You see the full cost breakdown before you start. There is no confusion. No hidden fees. No surprises.
This is transparency built into the system.
Part 6: Understanding the Chart
The PRO section includes a TradingView chart.
You can choose which cryptocurrency's chart you want to see.
This chart shows the Assets' price history. You see:
Candlestick patterns (each candle represents one time period)
Volume bars
Price change indicators (green = price up, red = price down)
Chart Controls:
Time Intervals
Choose how much data each candle represents:
Click any interval to change the view.
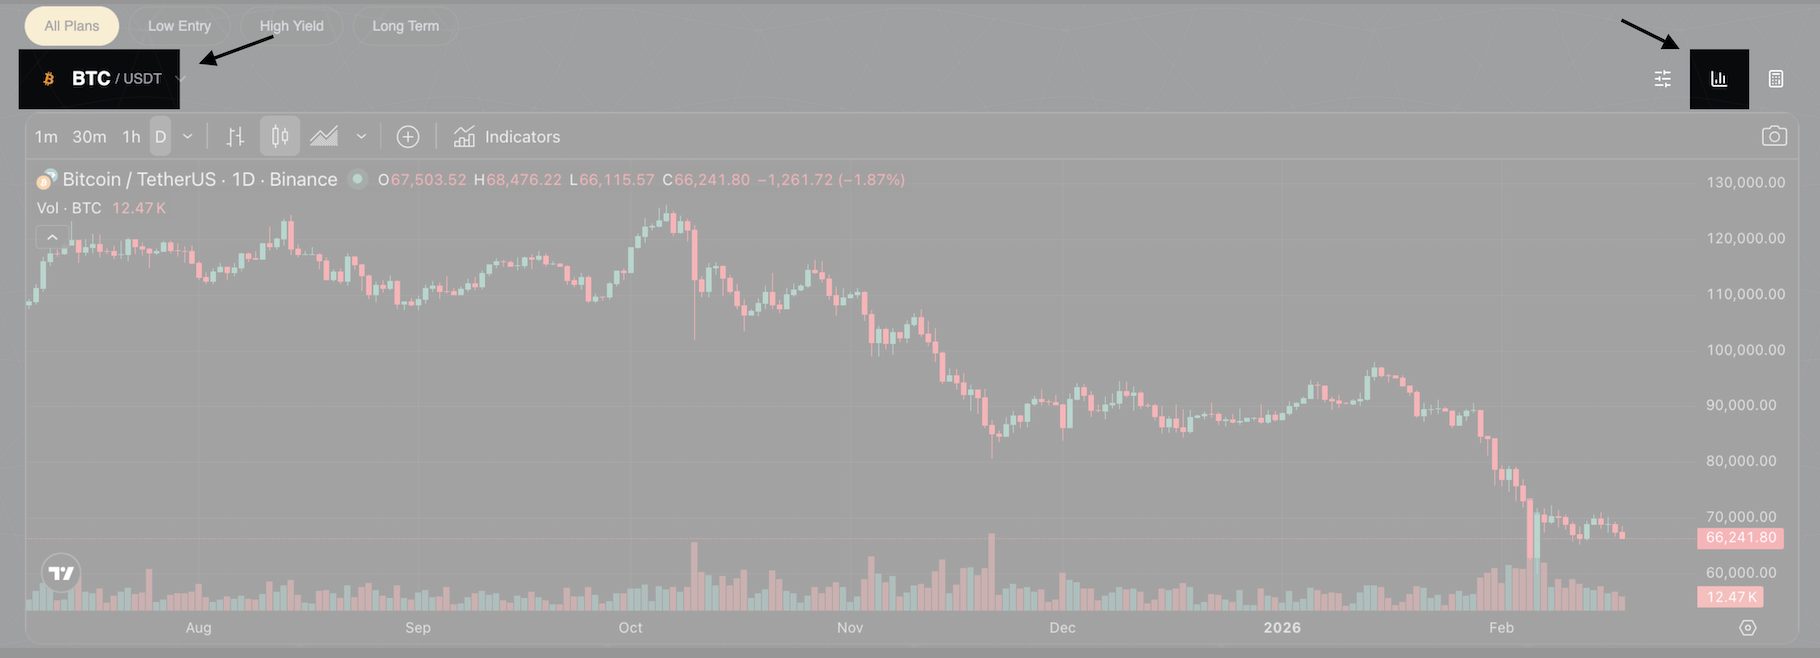
Indicators Button
Click this to add technical analysis tools (moving averages, RSI, etc.).
Drawing Tools
You can draw lines, mark price levels, and add notes. This helps if you want to track specific price points.
Need Help?
If you encounter issues during account creation that this article does not resolve:
Contact Bitlease Support:
Email: support@bitlease.com
Subject: "LTO Contract Issue"
Include: Description of the problem, any error messages, and steps you have already tried
Response time: Within 24 hours
For urgent security concerns:
Email: security@bitlease.com
Please see the following article for LTO Contract Trooubleshooting
/Troubleshooting Modify LTO contract